

Usually I’m flying in at the last second with Movies and Munchies. This time, I’ve had my recipe for weeks and I’m so excited to share it!
This month, Juli from Pandemonium Noshery was inspired by current events and chose the Ukrainian comedy, Servant of the People, which stars the current Ukrainian president, playing the president, before he was president. Yep, wrap your mind around that one! Ha!
The show is readily available online and subtitled in English. Thankfully, it is very engaging and funny, so it is totally worth the subtitles. Hubs and I are partially through the first season and quite enjoying it.
There is plenty of food inspiration in the show, plus the Ukrainian setting as well. My inspiration was taken from the first episode. When Vasiliy first becomes president, he briefly meets with his former boss (who had recently reprimanded him) who thrusts a gigantic decorative bread into his arms.
I was googling immediately and quickly found my way to Korovai, or Ukrainian wedding bread. Yep, you read that right. From what I can tell, instead of a wedding cake, Ukrainian couples often serve a beautiful (sometimes tiered) bread, and it is stunning (this also adds to the satire of the show). I love baking bread, and I just knew I had to make it.
As I started researching korovai recipes, I noticed some variation (flavor additions like citrus zest) but the basic bread was the same and it looked very familiar. I realized that the most basic korovai recipes were almost identical to the recipe I have for my grandma’s 2 hour buns!
Recently, my grandma shared that the family left Germany because there was land to settle in Russia (now Ukraine). The family stayed 2 generations in Russia before the men were to be conscripted into the army and at that time (around 1910) they decided to immigrate to the United States.
With my family history and the similarity between the recipes, I decided to use my grandma’s recipe for the base bread and another recipe for the decorative pieces.
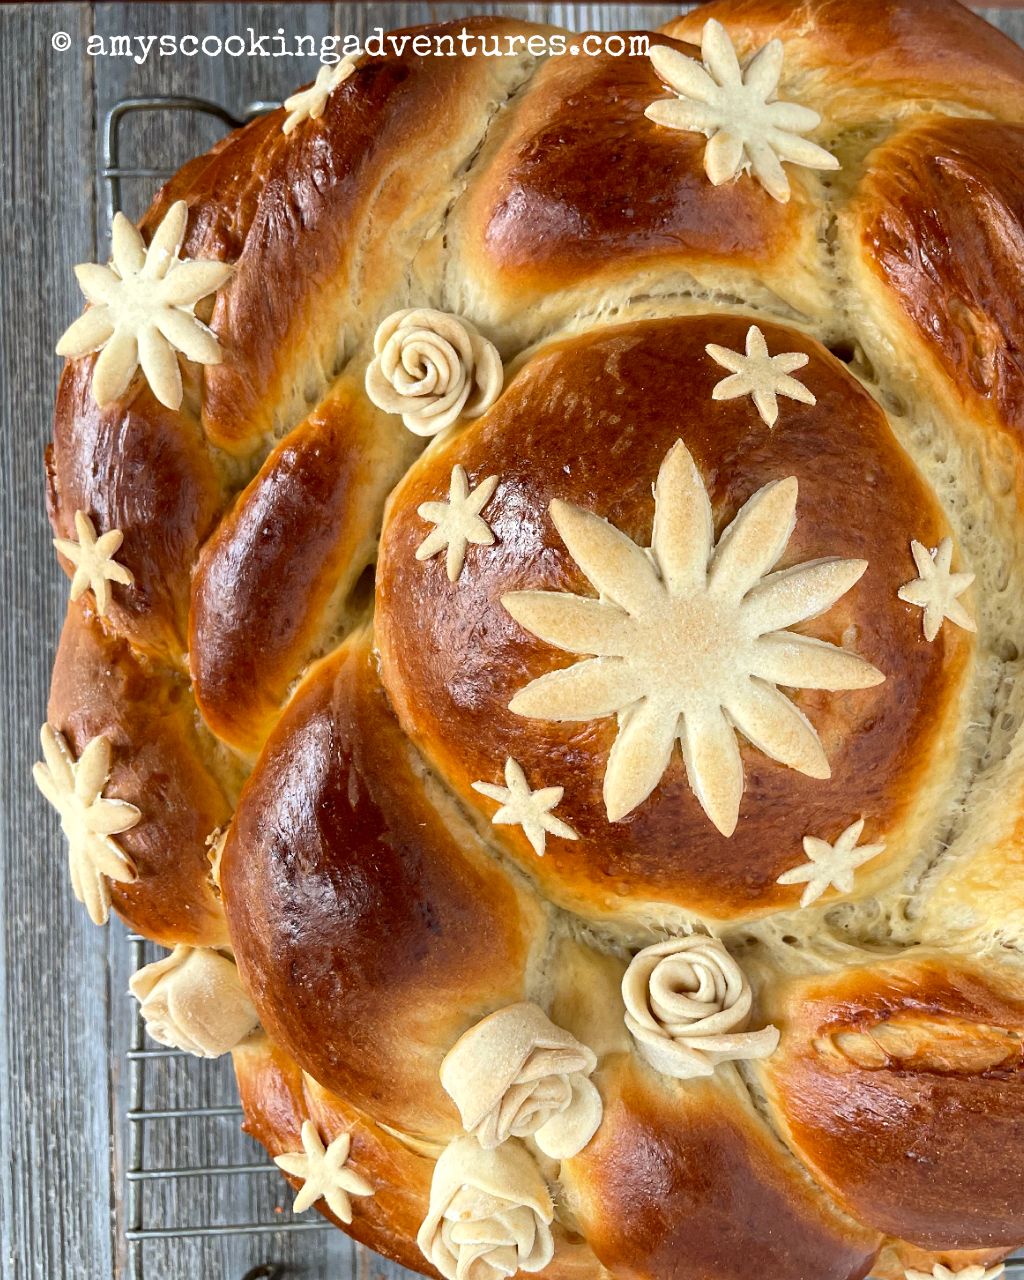
The resulting bread was as delicious as it was stunning.
Korovai
Bread
½ cup warm water (around 110 degrees F)
2 packages (4 ½ tsp) active dry yeast
1/3 cup sugar
1 ½ cups milk, lukewarm
1/3 cup butter, melted and cooled slightly
2 eggs
1 tsp salt
6 ½ cups all purpose flour, divided
Egg Wash
1 egg, beaten
1 tsp water
Decorations
¾ cup + 3 tablespoons flour
2 teaspoon cornstarch
2 teaspoons shortening
¼ cup water
In the bowl of stand mixer, combine the water, yeast and allow to proof for a minute or two. Add the milk, sugar, butter, eggs, salt, and 2 cups of flour. Beat with the paddle attachment until mostly smooth, about 2 minutes.
Switch to the dough hook and gradually add the remaining 4 ½ cups of flour. Knead with the dough hook on medium-low speed until the dough pulls away from the sides of the bowl. If the dough is sticky, add up to ¼ cup additional flour. Turn the dough out onto a lightly floured surface and knead a couple times to form a smooth ball. Place the dough in a greased bowl and cover lightly with plastic wrap. Put in a warm place to rise until the dough is light and doubled; about 1 hour.
Meanwhile make the dough for the decorations.
In a medium bowl, stir together the flour and cornstarch. Cut the shortening into the flour completely so no lumps remain. Add the water and stir until a dough forms (I needed to add a little extra water). Turn out the dough and knead until smooth. Cover and set aside to rest for 20 minutes.
Once the dough is doubled, turn it out and punch down.
Spray a 9-inch springform pan with nonstick cooking spray. Prepare the egg wash by beating together the remaining egg and 1 teaspoon water.
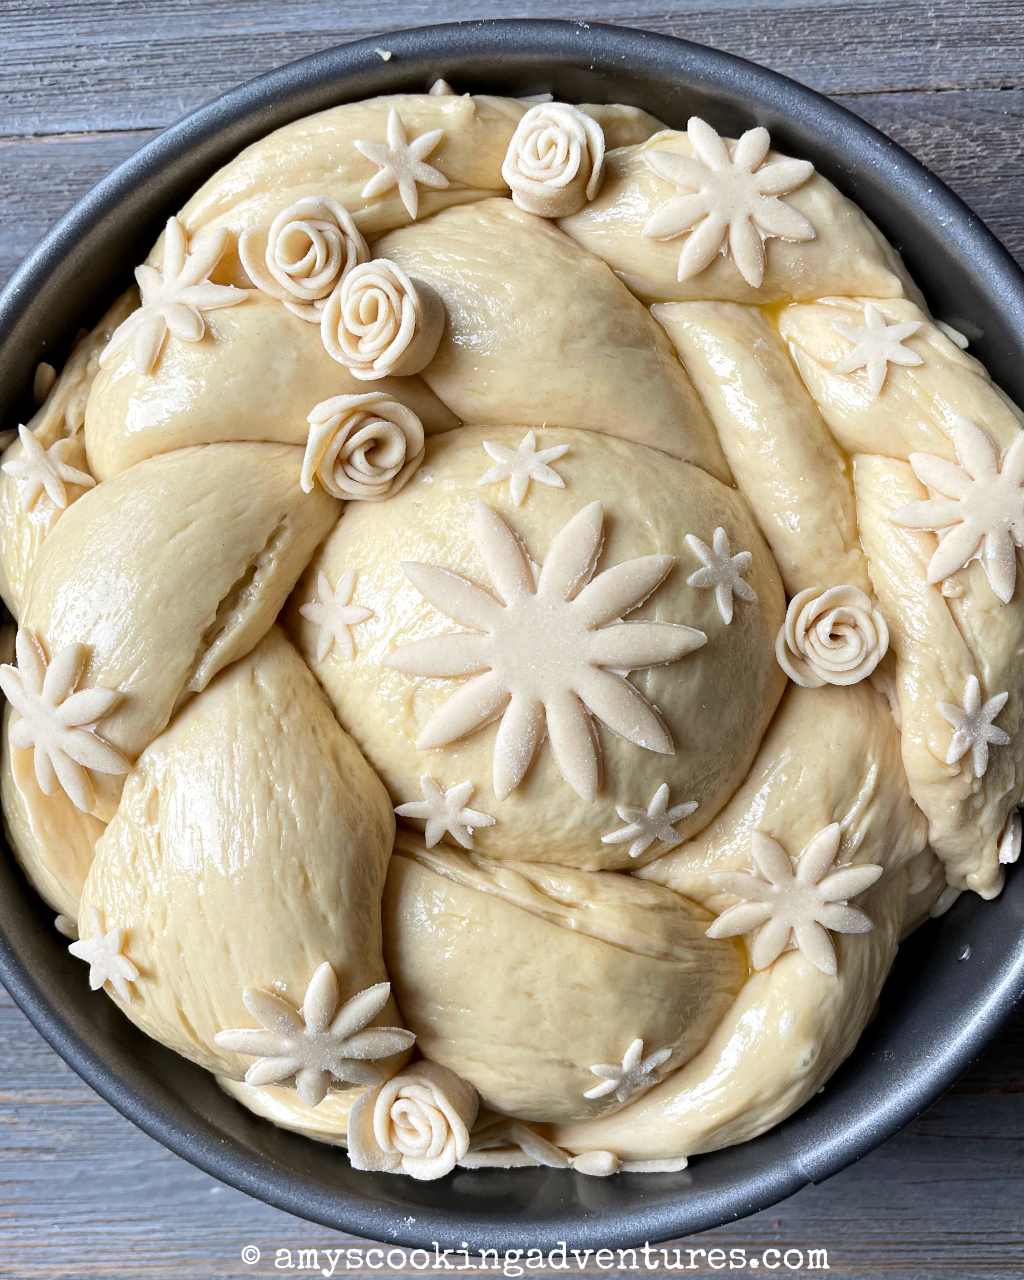
Divide the dough into 4 equal parts. Shape one piece into a ball, and place in the center of the pan.
Shape the remaining 3 pieces into long ropes and braid together. Drape the braid around the center ball, toward the edges of the pan. Brush all over with egg wash.
Roll out the decoration dough as thinly as possibly on a lightly floured surface. Use cookie cutters to cut flower shapes. Attach the flowers with egg wash.
Cover the bread and set aside for 20-30 minutes or until risen.
Preheat oven to 400 degrees F. Place the bread in the oven and bake for 15 minutes, then turn the oven to 325 and bake for another 35 minutes. If the bread starts browning too early, tent with foil.
That looks very lovely. Bet it tastes good also.
ReplyDeleteAmy, can you share your tips on adding the decor on the sides or the bread? Love that!
ReplyDeleteI lightly brushed the outside of the bread with egg wash and stuck the flour shapes on. In some areas around the edges, I had to push the dough back from the sides of the springform slightly to make room for the decorations.
DeleteI did know you replied but that’s exactly what I did. Thanks.
DeleteAnother question…directions end abruptly. How long should it cook before removing springform and how do I avoid it sticking to the sides? Also any tips to avoid a lopsided result? Mine came out pretty well and it’s dairy free. Used oat milk and vegan butter so my hubby can taste test. But I need one more practice run before my daughters wedding to avoid the lopsided rising.
Delete1. In an earlier direction, the springform is sprayed with nonstick cooking spray to avoid sticking.
Delete2. I opened the springform once it was cool enough to handle
3. Honestly, mine was lopsided as well if you look closely at the photo. I suggest clicking the link in the text which were my inspiration for this recipe. Some of those have additional tips for baking korovai - good luck!
This comment has been removed by the author.
ReplyDeleteOne more thing…milk is missing from directions just an FYI. Thanks for the recipe. It’s simple enough and smells great. This time I used cows milk and butter. Now to just figure out how to retain its freshness till next Sundays wedding!
ReplyDeleteI used your recipe to make a korovai for my grandparents 60th wedding anniversary and they were so incredibly touched! Thank you so much for the recipe; it tuned out so great! It’s officially Ukrainian grandma approved :)
ReplyDeleteThis makes my heart so happy! Thank you for sharing!
Delete